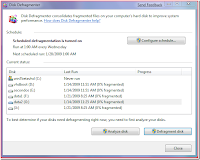
 One of the easiest ways to manage your computer and its file system is to regularly defragment your computer. The files become fragmented, as you use your computer. Your disk stores files in the same cluster and when you delete these files, gaps are left between files. When you install any application, it tries to use this empty space, which degrades performance in the program and your system.
Certain activities can cause your computer to fragment more quickly. Few problems with your computer are more inconvenient than working with a heavily fragmented disk. Your computer can literally slow to a crawl, to the point that getting anything done is almost impossible For instance, large installations, watching DVDs, or extensive Web surfing tends to impact performance. For these reasons, you should consider defragmenting your computer regularly.
Windows 7, like its predecessors Windows Vista, offers a disk defragmentation tool called Disk Defragmenter.
Use Disk Defragmenter to place all of the parts of a file in one contiguous, or adjacent, location. This procedure, which efficiently rearranges all of the iles and unused space, is called optimization. It makes your programs run faster and you can quickly access your files and folders.
Steps to perform this task:
STEP 1. Click the Start button- Programs-Accessories-System Tools and click Disk Defragmenter.
STEP 2. Click Configure schedule.
STEP 3. Select the Run on a schedule check box.
STEP 4. Click the list arrows, and then specify how often, what day, a what time.
STEP 5. Click Select disks, select the drives you want, and then click OK.
STEP 6. To defragment disks now, select the drives you want. Press and hold Ctrl to select more than one drive.
STEP 7. To analyze your disks to determine if you need defragmenting, click Analyze disks.
STEP 8. Click Defragment disks.
STEP 9. To quit the process, click Cancel Defragment.
In a nutshell, Windows 7 features a new graphical user interface for the Windows disk defragmentor that offers users with more control over defrag jobs and displays more detailed information about each job. You can also safely discard the defragmenting process any time without any adverse effects.
Like Windows Vista, Windows 7 allows for scheduled defragmentation jobs. Defragmentation is automatically scheduled by default, which means that most users will never have to adjust any settings in order to optimize disk performance. By default, the defragmenter is set to run at 1:00AM.
The ability to defragment multiple volumes simultaneously is also added in Windows 7, and the operating system will automatically disable defragmentation on any solid state disk since there's no need to defragment flash memory and continued write access to the disk could actually shorten its life.
Among the other changes under the hood in Windows 7 are the following:
Defragmentation in Windows 7 is more comprehensive – many files that could not be re-located in Windows Vista or previous editions can now be optimally re-placed. In particular, a lot of work was done to make several NTFS metadata files movable. This ability to relocate NTFS metadata files also helps volume shrink, since it enables the system to pack all files and file system metadata more closely and free up space “at the end” which can be reclaimed if required.
Windows disables defragmentation on that disk, if solid-state media is detected. The physical nature of solid-state media is such that defragmentation is not required and could minimize overall media lifetime in certain cases.
By default, defragmentation is not enabled on Windows Server 2008 R2. Given the variability of server workloads, defragmentation should be enabled and scheduled only by an administrator.


0 comments:
Post a Comment